
I wanted to understand the process of enabling a VPN to access a private network so I tried to install this service in my private home server and enabling a VPN to access all devices in my home network. This was useful as a learning experience giving me knowledge for a possible usage at my work to a more demanding usage.
WireGuard is a VPN service that aims to be simple to configure and to use. It is build as a module for the kernel. However, even being announced as simple to configure, it still gave me some trouble to get it all working as I wanted, but with some guides all over the usual places, the goal was reached.
In the following lines I will describe the steps that I took to configure the WireGuard service in my home server and make it accessible anywhere on the world, but first I would like to thank the help and guide from the WireGuard Site, which is a great starting point, and a must read, mainly for understanding the tool; the Arch Wiki, not only because I'm on Arch Linux, but because their wiki is a great resource for almost every tool on the Linux world; and the Noah with this video that it's very detailed with an example of implementation.
Now, for my steps.
Creating the Keys
First step is to generate a key-pair to use in WireGuard, which itself provides useful commands to do this job.
Generate the private key with the wg genkey command, however, WireGuard
requires for the file permissions to be 077 so, execute these two commands:
#!bash
umask 077
wg genkey > server_privatekey
Next, generate the correspondent public key:
#!bash
wg pubkey < server_privatekey > server_publickey
Or all of the above in a single command:
#!bash
umask 077; wg genkey | tee server_privatekey | wg pubkey > server_publickey
And now should exit two files on the current folder, server_privatekey and server_publickey, that will be used in the WireGuard setup.
Setting Server Interface
WireGuard has a simple guide to setup a VPN connection manually, but I found out that it's better to make the configuration in a file. It is a great learning experience to follow the steps for the manual configuration, which teaches the inner layers used by WireGuard, but the configuration file is more direct, specially because Noah gave a tip for a template from Altispeed.
[Interface]
Address = 10.100.100.1/24
SaveConfig = true
PrivateKey =
ListenPort = 51820
PostUp = iptables -A FORWARD -i %i -j ACCEPT; iptables -A FORWARD -o %i -j ACCEPT; iptables -t nat -A POSTROUTING -o eth0 -j MASQUERADE

PostDown = iptables -D FORWARD -i %i -j ACCEPT; iptables -D FORWARD -o %i -j ACCEPT; iptables -t nat -D POSTROUTING -o eth0 -j MASQUERADE

[Peer]
PublicKey =
AllowedIPs = 10.100.100.2/32
Copy the above template and paste it into a new file called
/etc/wireguard/wg0.conf (or give another name, being the wg0 the name of
the interface that will be used.
Then paste the generated key from the server_privatekey in the PrivateKey field of the Interface section. Change eth0 in the PostUp and PostDown lines to the interface that connects the computer to the internet. And for now it should be enough, we will later come back to this file, after configuring a client, to add it's public key on the PublicKey field on the Peer section.
Note: if you don't know which is the interface that connects to the
internet, run the command ip addr and find the interface that has an IP
address set.
Some notes on the template
In the Interface section we have the fields: - Address - the address that will be used by the WireGuard interface on the computer. You can put anything in here, but try to use an address as different from your network addresses as possible to be easy to identify each interface network. - ListenPort - the port that will be used for the WireGuard VPN tunnel (being 51820 the most common). - PostUp and PostDown - are iptables configuration to forward the packets received in the WireGuard interface to the network configuration on the computer (it's using eth0 as the network interface, choose to what's used in your computer).
In the Peer section are the fields: - PublicKey - where the public key of the client will be placed - AllowedIPs - the IP that that peer will be accepted to communicate. It should match the IP configured as the interface address on the client.
Setting Client Interface
Moving forward to the next step, it's now time to configure the client.
First of all, let's generate the keys for the client as well, so repeating the command described previously:
#!bash
umask 077; wg genkey | tee client_privatekey | wg pubkey > client_publickey
Now for the WireGuard interface configuration, the
Altispeed also provides a template
for the client, that should be placed in /etc/wireguard/wg0.conf (or any name
you want):
[Interface]
Address = 10.100.100.2/32
PrivateKey =

[Peer]
PublicKey =
Endpoint = :51820
AllowedIPs = 0.0.0.0/0
PersistentKeepalive = 21
In this configuration, let's make the changes to point it to the server:
On the Interface section: - PrivateKey - paste the key from the client_privatekey that was generated.
On the Peer section: - PublicKey - paste the server_publickey from the server. - Endpoiint - where the IP/Hostname of the WireGuard server will be placed. Do not forget the trailing port for the server (here is the 51820 set on the server. - AllowedIPs - here is the place to add the IPs that the access should to redirect to the VPN interface. The 0.0.0.0/0 address set in the template sets all network traffic to the WireGuard interface, which means that the access to the internet will pass through the server computer and the server network. If there is only desired to access the server network, it should be configured in this field, the WireGuard IP of the server (in this example, the 10.100.100.1), and the IPs from the internal network. Latter in this page there is some examples to explain this setup. - PersistentKeepalive - some connections that pass through firewalls and other gates will need some regular data transfer to keep the connection open. WireGuard by default is very silent and only communicates when necessary. To keep this connection open, add a value (in seconds) to this field to keep a regular request and maintain the connection open.
IPv4 packet forwarding
If the propose of the VPN connection is only to access the server computer, the
steps taken until now must be sufficient, however if you want to access the
network of the server or even access the internet through the VPN server, it
must be configured, in the server, to forward all packets that arrive through
the WireGuard interface to the Ethernet port that it's connects to the network.
This is done writing the value "1" in the /proc/sys/net/ipv4/ip_forward.
This will enable the IPv4 packet forwarding on boot, to enable right away run
sysctl -w net.ipv4.ip_forward=1 as root.
Testing
We reach the time to test our new connection.
First, don't forget to get back to the server configuration, and in the PublicKey of the peer section past the client_publickey generated in the previous section.
After saving everything on booth server and client, run, as root, the following command (replace wg0 with the name of the configuration file if you gave a different one):
#!bash
wg-quick up wg0
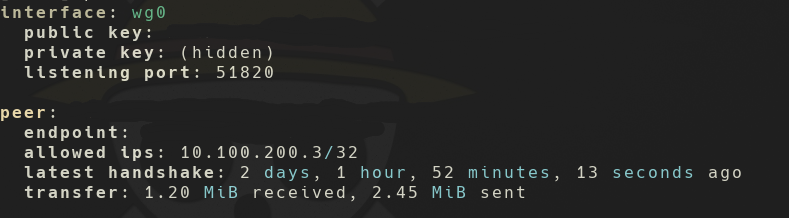
And if there are no errors, it should be working. On any one of the computers
you can run, as root, the command wg which shows the status of your
connection. If everything is working, it should tell that it's receiving data in
the peer, like this example:
Another way that the interface can be tested, if the two computers are in a
completely different network, is to go to IPChicken on
the client and check what is you public IP. Then turn on (or off with
wg-quick down wg0 if you already turned the VPN on) and check if the public IP
changed.
IPs configuration examples
To set the allowed IPs field on the client side to redirect the packets, you should carefully think what do you want to sent through the VPN connection. As the example shows, setting this field to 0.0.0.0/0 will send all traffic to the VPN, which means that the client will be accessing the internet as if connected to the server network. But if, for example, the goal is only to access the devices in the server network, you should be enough to make the following configuration on the client:
[Interface]
Address = 10.100.100.2/32
PrivateKey =

[Peer]
PublicKey =
Endpoint = :51820
AllowedIPs = 10.100.100.1/32, 192.168.1.1/24
PersistentKeepalive = 21
This configuration sets all the traffic meant to the server at address 10.100.100.1 through the VPN, as well as all requests for the addresses in range of 192.168.1.1 - 192.168.1.255, which represents the devices in the server network.
The Mask
The /24 after the address is a notation to set the mask for the IP address. Simply put, it tells which parts of the IP are fixed, and which changes, and represents the bits set in the mask. An IP has 32bits (4 * 8 bits), and the /24 sets a mask of 255.255.255.0, which defines the range defined above. The /32 sets the mask 255.255.255.255 which means an exact IP address.
Other considerations
This guide uses Arch Linux as example, but should be fairly equal to all distributions. Also, WireGuard has clients for Windows, Android, Mac and IOS, where the configurations have the same steps and fields, but using graphical tools.